HOME - NEWS - GOOD STUFF - INTERVIEWS - OPENINGS - MUSIC - CALENDAR - ABOUT - RSS - SHOP -  FFDG 
  >>>STREET ART || PAINTING || PHOTOGRAPHY || COLLAGE || ILLUSTRATION || DESIGN || GRAFFITI<<<   contact us


Home FEATURES Artist Interviews How To Make a Pinhole Camera

How To Make a Pinhole Camera
Monday, 11 December 2006 11:45
Build your own camera with just a can and some tape! Andreas shows you how.
Hello. Sorry it's been so long since I've posted a new how-to column. Just between you and me, I think my fondness for the booze may be interfering with my work. Don't tell anyone, though, okay?

After the strong responses we got to the first couple of columns, I had to sit down and ask myself, "Andreas, where do you go from here?" I asked John, too. "John," I said, "where do we go from here?" And together we puzzled over our dilemma. Sure, we had received some suggestions: home dentistry; prosthetic limb manufacturing; tattooing dead animals. But none of these really spoke to us the way you want a good arts and crafts project to speak to you, to sit you down and look you earnestly in the eyes and say, "Hey art fag, do me. I'm worth your time. I'll be fun and educational. You won't regret it, I promise."

So keeping all that in mind (fun-ness, educational-ness, artsy-ness, faggy-ness, etc.), we decided to build a pinhole camera and take some photos. And since most of the pinhole cameras built in the United States are manufactured by borderline retarded high school students (it's a fact), they ain't too difficult to build neither! So go ahead and keep reading. You may even have all the materials you need to build your own pinhole camera already lying around your filthy house. Or maybe your roommates do, in which case all you have to do is steal them. In any event, all you really need is a little bit of time and, like, $12-15 for materials if you're not cool/clever enough to steal it all... Okay, here goes. Are you with me?

What You'll Need

  • One of those cylindrical Quaker Oatmeal boxes. Try and get one that's around 7" tall.
  • Some heavy paper, like construction paper, but not that cheap shit from junior high art class.
  • Elmer's Glue.
  • Krazy Glue.
  • An aluminum can.
  • A pin.
  • Black spray paint.
  • A ruler.
  • A very sharp razor or X-Acto.
  • Some light grit sandpaper, although griptape will work in a pinch.
  • A marker
  • Some resin-coated, medium contrast, black and white photographic paper, size 5" by 7". I like to use Ilford satin finish. It's about $8.50 for a pack of 25.

Building It

That's pretty much everything. Although, to be honest, it does help if you have access to a darkroom and a dark bag for changing the film. More on that later. For now, let's fucking build this motherfucking camera! (Say it with me.) Booyah! (sorry)

Moving on: first off, find yourself a nice clean work area. Free from clutter and distractions. Set up all your materials in front of you like this:

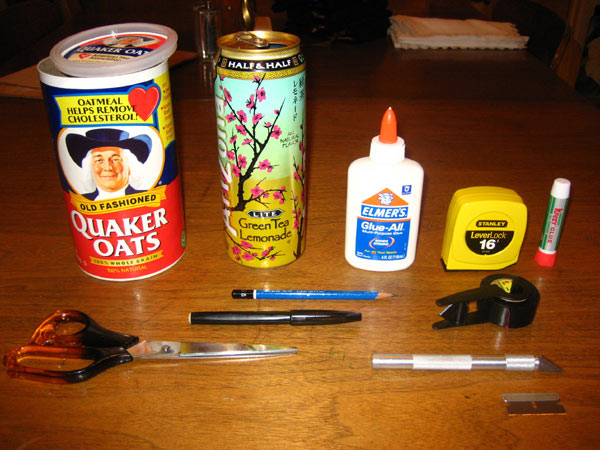
Doesn't that look nice? It's like a laboratory or something. Man, I wish I had beakers and a Bunsen burner. Now get comfortable. Put on a record or something. May I suggest something soothing, yet inspirational? I've been listening to Band of Horses a lot lately, maybe try them. But really, whatever you feel like listening to is fine. Except for Hoobastank because only retards listen to them.

Okay, step 1: locate the middle of the oatmeal can. Wait, actually, first you have to eat all the oatmeal. Don't just throw it away. I didn't have any oatmeal at home, so I went out and bought some but then I got bummed because I couldn't start on the camera right away since I had to eat all that fucking oatmeal. I hate being wasteful, so I ate oatmeal three times a day for two days and even baked oatmeal cookies. They were delicious.

After you eat all that oatmeal, take your ruler and locate the center of the can.

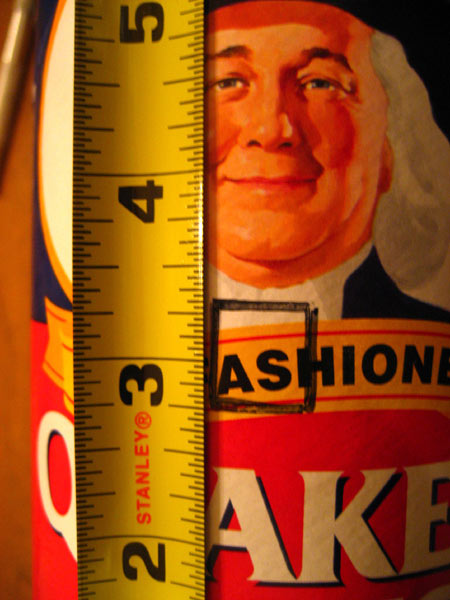
Use that fat Quaker bastard as a reference point. If you'll notice, the center of the can is directly below his fat fucking chin. Sweet. We're going to give this motherfucker a tracheotomy. Draw yourself a little box, about 1/2" by 1/2". That's where we're going to cut him.

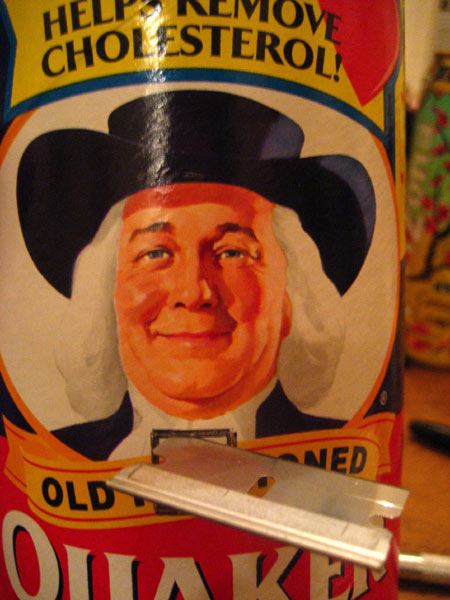
Can't you almost hear him screaming? He's all, "What are ye doing? What have I ever done to offend thee, good sir?" Go ahead, take out life's many frustrations on him. Just be careful that you don't cut yourself. Or go ahead and cut yourself, I don't care. But make the cuts in the can neat.

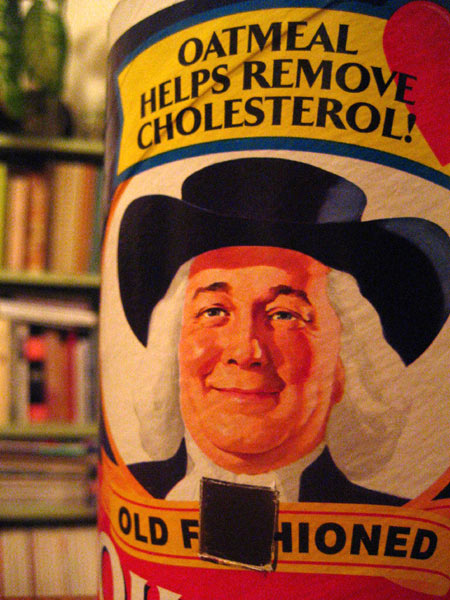
You could get one of these neat tracheotomies too if you don't quit smoking! Then you can scare neighborhood kids with your robot voice-box! How cool would that be?

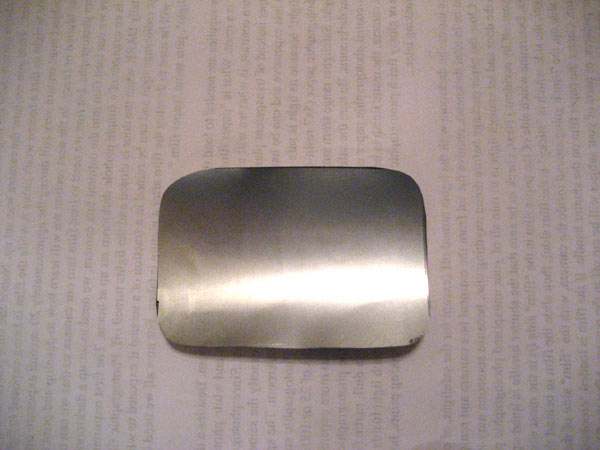
Next up: take the plastic lid and squirt a bead of that Elmer's glue all around the inside of it like this:

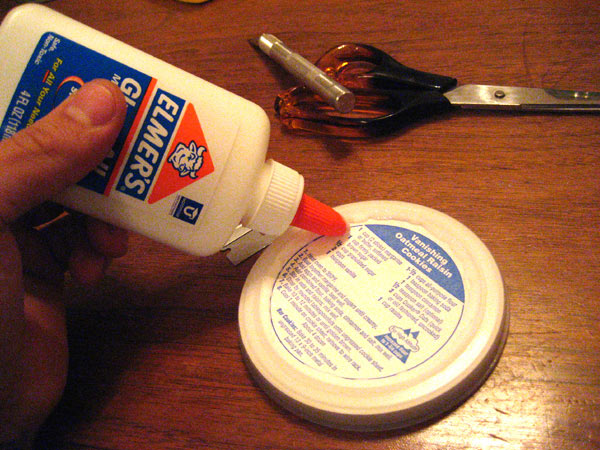
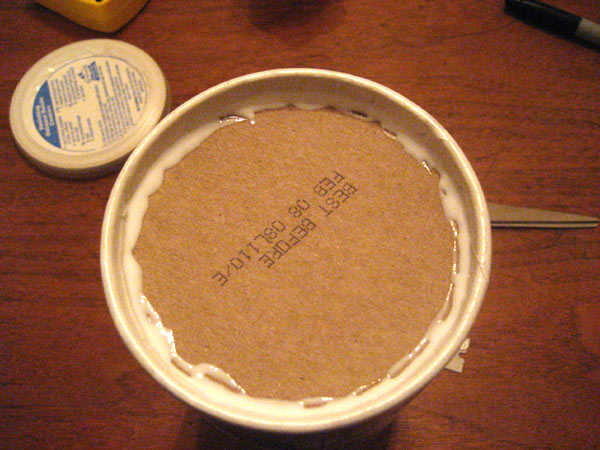
This will help later when we paint everything to get rid of light leaks. Also, note the fabulous recipe! Save that for later. And as long as you've got the glue handy, why not glue the bottom of the can too?

Then, take any leftover glue and rub it all over your hands. Wait for it to dry and then peel it off like dead skin. That shit used to crack me up in grade school. It's not nearly as cool now, but I figure you should do this anyway because when was the last time any of you played with Elmer's glue?

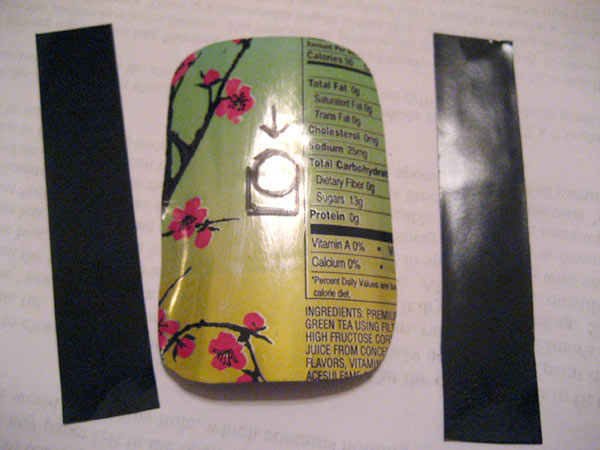
Next, take your aluminum can and cut the top and bottom off like so:

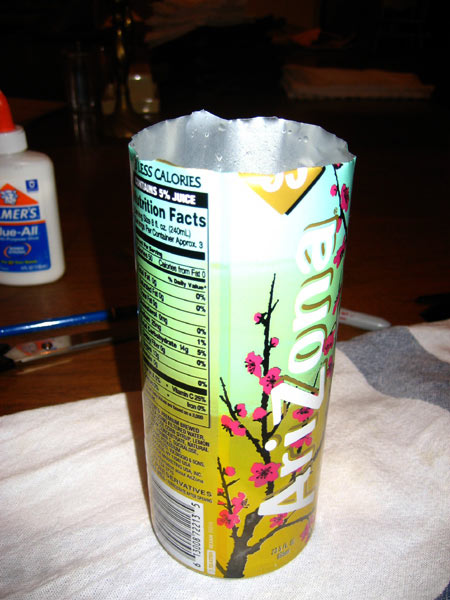
I know what you're thinking. You're thinking, "Andreas, you pussy, green tea? Where's the beer?" All I can say to that is: Get off my back, okay? I don't need your shit right now, Darlene. I've had a really hard day and the last thing I need is to come home to your griping. You're starting to sound just like your mother.

Then cut the can lengthwise and lay that aluminum out flat.

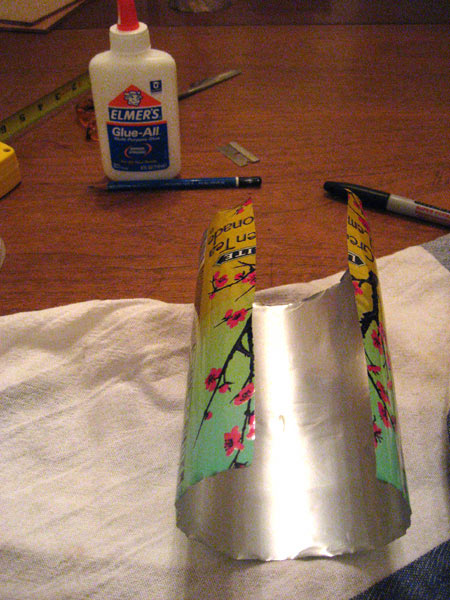
On one side, draw a little rectangle with your marker. Make it about 2 by 3 inches.

Then cut it out with your roommate's good scissors, keeping in mind that the sharp corners of aluminum can cut tender little hands. So round those fuckers off, okay?

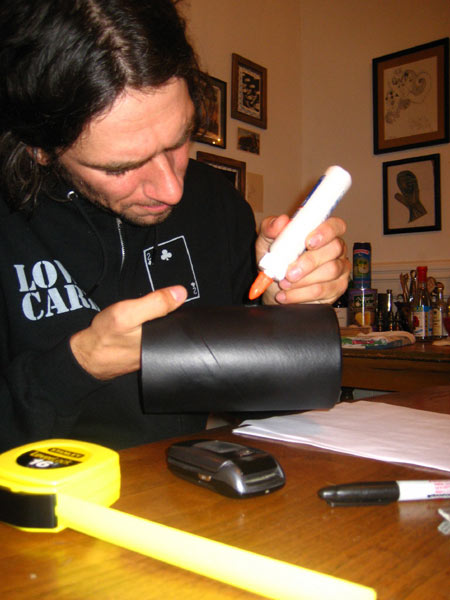
Now you're ready to move outside. Grab your oatmeal can, the lid, and your black spray paint. You might want to lay out some old newspaper to keep things clean, but I'm not the boss of you, so go ahead and do whatever you feel like. Personally, I like to use paper because I wasn't raised in a barn.

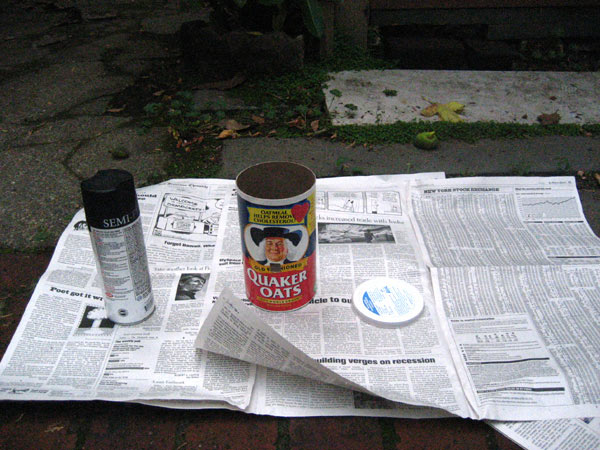
Spray the can, inside and out, to make it nice and black. This helps it to be really lightproof. For those of you out there who don't have any can control (not the dudes who read Mike Giant's column, obviously), use short bursts of paint. Don't over-saturate it with drips and shit. Just kind of repeatedly dust the can with paint to make it nice and even. Then spray the lid, too, both sides. Notice where we put the Elmer's earlier? The glue and the paint made all the seams lightproof. Genius!

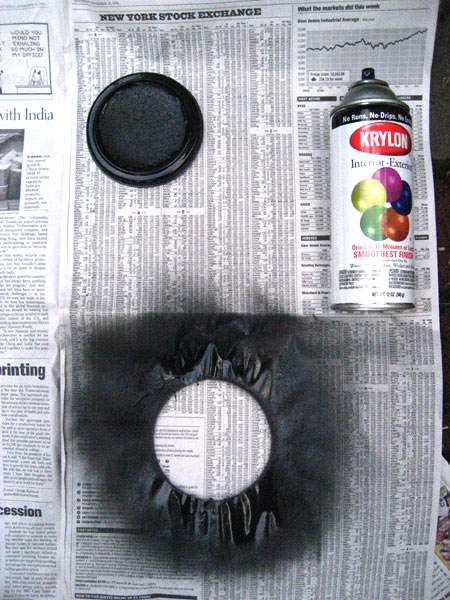
As long as you've got the spray paint out, why not practice your tag?

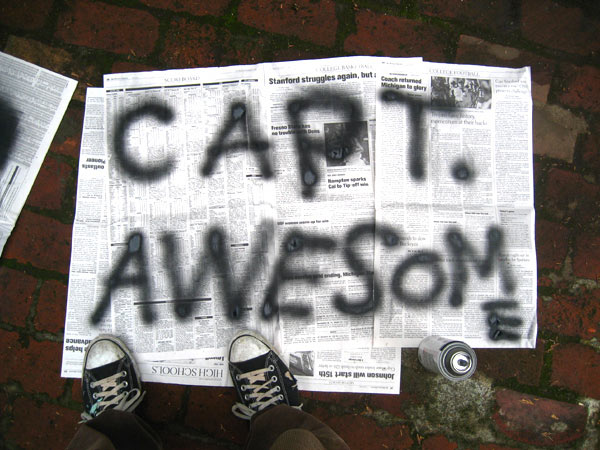
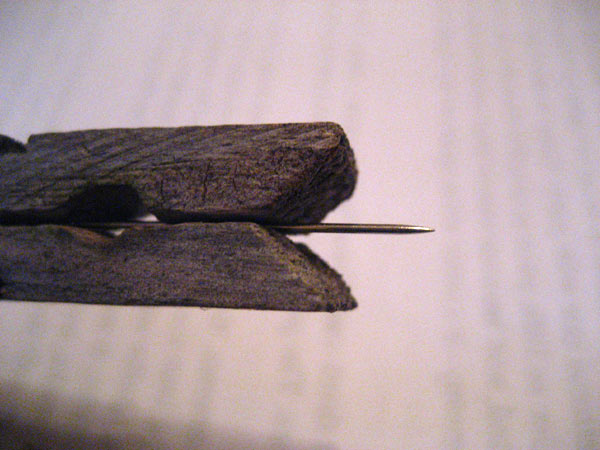
Yep, that's me: Capt. Awesome! Nothing says AWESOME like writing your fake name on some shit, right? Feels good, huh? Totally. Back to the camera: once everything is dry, head back inside to your work area. Get your pin ready. If you've got sensitive girly hands like me, you may want to hold the pin in a clothespin or a set of pliers like this:

Then grab that piece of aluminum from earlier. This is where we're actually going to make the pinhole. The reason that we're making a hole in the aluminum and not in the actual cardboard oatmeal can is this: when the camera is fully assembled, the beam of light that comes in through the hole (the aperture) has to be very fine. Seriously, just the tiniest little pinprick of light is supposed to get in, there's some weird mathematics that goes along with this and tells you how come it works, but I'm no mathematician but it goes kind of like this:

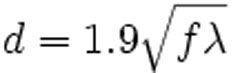
Wherein d=the diameter of the aperture, f=the focus length (the distance between the aperture and the film), and that little symbol that looks like a weird teepee=the wavelength of light. Now don't get all worked up because you don't own a graphing calculator or a sliderule or anything. This formula is really just academic and has pretty much no practical effect on the construction of a pinhole camera. It's just to show how smart we all are.

Anyhow, the gist of it all is this: If the walls of the aperture are too thick the little beam of light won't be in proper focus because it'll be too narrow. Hence, ultra-thin aluminum walls!

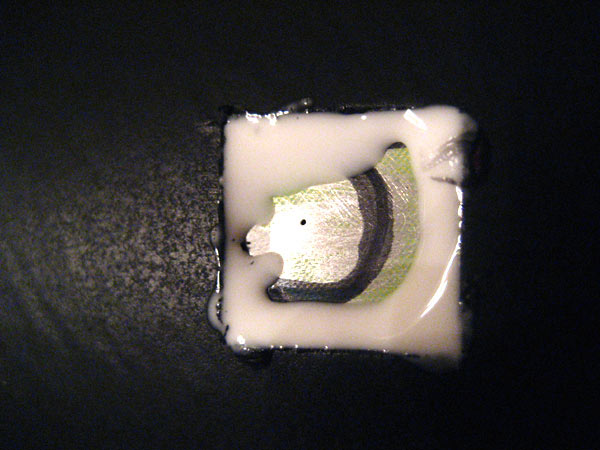
Once you've gotten over your deep-seated math anxiety, simply place your aluminum rectangle on your work surface and ever-so-slightly poke through it with your pin. Technically, the best pin to use for this is a #16 sewing needle, but I would feel awfully gay going into a sewing store and asking specifically for a #16. I used a regs needle that my roommate, Mariah, had in her sewing kit.

Poke very carefully. Turn the needle a bit to bore through the aluminum if you have to. But seriously, just push the very tip through. Just the tip! Just a little bit! Come on, it won't hurt. Then, when you've made a very tiny hole in there, grab your sandpaper and do some sanding on both sides of the aluminum. This will get rid of any burrs around the aperture as well as making the walls as thin as possible. Don't go nuts, but, you know, sand it down a little.

Success! Look at that tiny, little hole. And then look at how much sodium that green tea has. Shit.

Once the hole is finished, run some water over it to clean out any excess dust and grit. Make sure not to actually touch the aperture with your grubby little fingers because all that grease can ruin a nice pinhole. Rinse it off and pat it dry, then back to work.

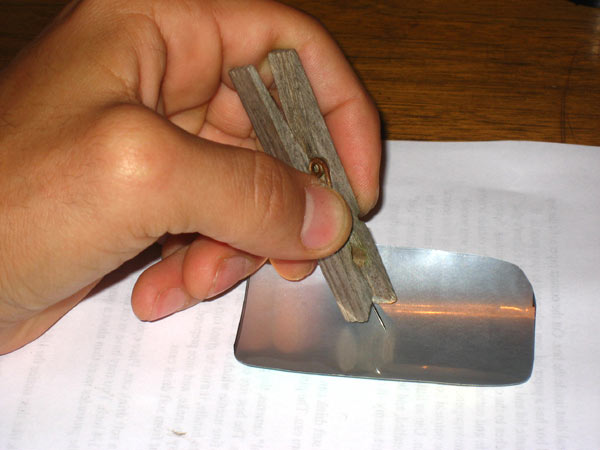
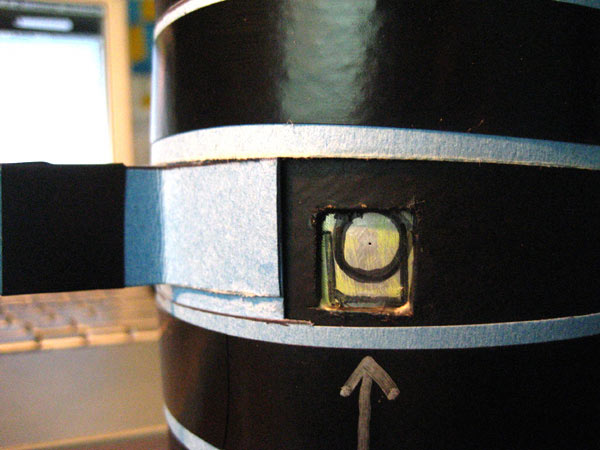
Cut two pieces of electrical tape, slightly longer than the long side of the aluminum. Then grab some of that Krazy Glue and put a bunch of it in the area around the aperture. Now we're going to glue this whole rig to the inside of the oatmeal can. Don't glue your fingers together, okay? I'm talking specifically to you, Dave Franklin.

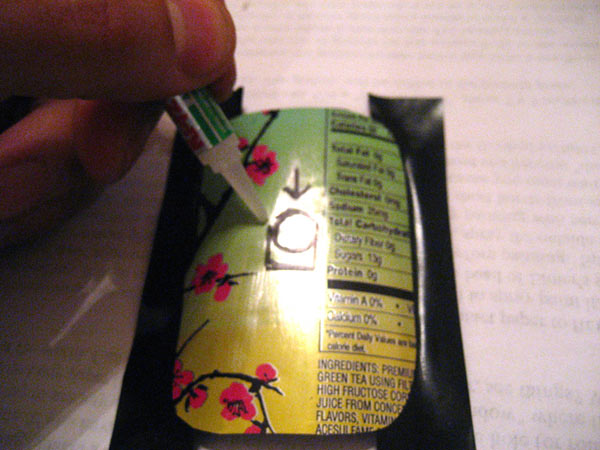
Go ahead and line up your aperture with the little square we cut out earlier from that fat Quaker bastard's neck. Press the aluminum down on the inside of the can and hold it for a few seconds. The glue should bond pretty quickly.

You can even put an extra drop or two of Elmer's on the outside just to make sure the aperture stays extra snug. You don't have to, but I'm kind of OCD about shit.

Holy shit! Guess what? We're sort of almost done! Go ahead and have a beer while the glue dries. You've earned it.

The next step is to make a shutter for the camera. The easiest kind to make is a sliding shutter. It has two parts: the shutter and the track. Both parts are made out of heavy stock paper, tape, and some glue. Easy as shit. First, cut two matching strips, about 7" long and an inch or so wide. These will become the track.

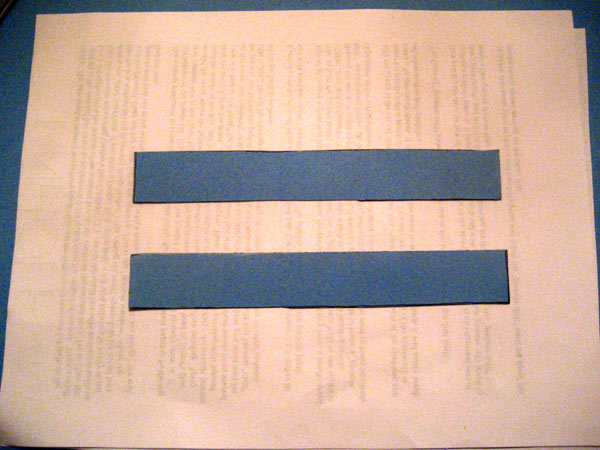
Then cut two more pieces:

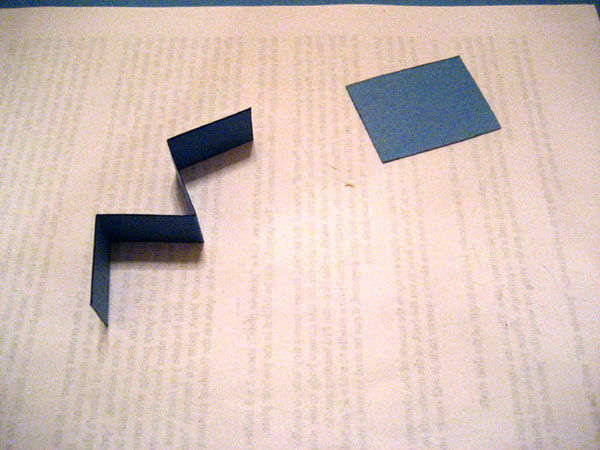
1 - 2 1/2" by 2 1/2"
1 - 3/4" by 4"

These two combine, like Voltron, to form a mighty shutter! Lord Zarkon better watch right the fuck out.

Take the long piece and fold it into four sections, as shown above. Put a dollop of glue near the middle and fold the whole thing into a T. Maybe you even want to put some electrical tape around it, which is fine. Go ahead. This is the shutter handle. Take the shutter handle and glue it down onto the other piece like this:

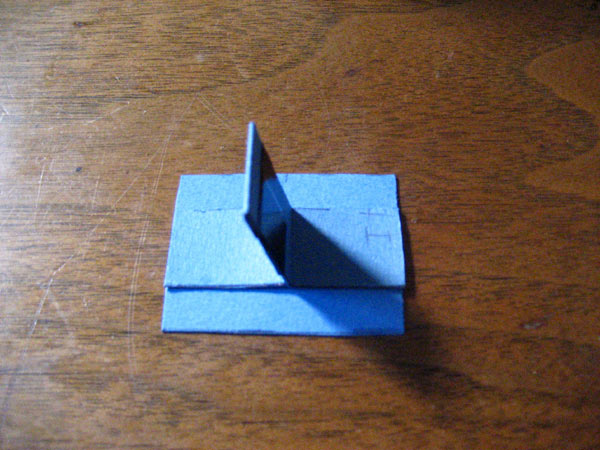
Make sure to place it in the middle so that the edges of the larger piece protrude to either side. Viola! This is going to fit into the shutter track and you'll have a fancy shutter for your fancy camera. Attach the shutter track to the camera body, leaving enough room for the shutter to easily slide back and forth in between. Like so:

Also, you may want to make a little mark to show where the aperture is so that you'll know which way to point your camera even when the shutter is closed.

That's all the basics of a functioning pinhole camera, but why not go ahead and name your creation, too?

You can even jazz it up with some stickers! Yeah!

Guess what? You are now the proud owner of a pinhole camera. Congratulations, you're pretty much as smart and dexterous as a kid that goes to a vocational college. You're right up there in the ranks with George Eastman, Alfred Stieglitz, and Henri Cartier-Bresson! Actually, wait. No you're not. That was easy. The difficult part starts now: making pictures! Ready? Okay.

Shooting With It

First things first: I know we live in an age of instant gratification and digital this and megapixel that, but this project is about as far removed from all that as you can get. Well actually, we could have gone one better and just built a Daguerreotype, but seriously, who am I, Mr. Burns? Eeehhhh, would you like to see some wonderful stereopticon images of the Crimean War? But even so, you've got to have patience and a steady hand for this-two qualities I am proud to say that I now possess. Also, I should mention that the conditions for producing quality pinhole photographs are very specific. So don't even bother planning on shooting any photos unless it's a really, really sunny day, all right?

This was my first time building a pinhole camera as well, so I figured most of this shit out via trial and error. My first mistake was thinking that, like with a regular camera, you can just compensate for a less-sunny day by increasing the exposure time. Nope. Failure! The fact is that regardless of exposure time, you need really sharp, bright light in order to even create an image. It's like a camera obscura. Have you ever been inside one of those? If you're in the Bay Area, they have one at the Cliff House. Go check it out on a cloudy day. Crappy, right? Totally... So just trust me when I tell you to wait for a sunny day.

Next problem: exposure time. This one is kind of tricky. Point is, there are going to be some variables here, and you're going to fuck up a couple of times before you get it right. I'm just trying to help you minimize the fucking up, but you're still going to have to experiment a bit.

A good rule of thumb for exposure times is keeping it around 10 seconds. Although this will vary depending on how big you made the aperture. Try starting with a 10 second exposure and then printing the photo (more on that to follow), and figuring out where you went wrong. Then do it all over again with the proper adjustments.

So now it's a sunny day! Awesome. Go load up your camera and run into the street. Loading the camera is easy, but you have to do it in total darkness. Or, preferably, in a darkroom with a safe light (a red one). Although it's actually not a big deal to load the film in a totally dark room, so dark that your eyes might as well be closed. Simply hold the camera body in front of you, keeping the shutter handle pointing directly ahead, then take a piece of the photo paper (remember: don't open that shit unless you're in the dark!) and put it into the can opposite the aperture. It'll fit nicely along the concave wall of the can, which will give you a nice wide angle shot when taking photos. Then put your lid back on and decide on what you want to photograph, keeping in mind that it'll have to sit still for 10 seconds.

Remember, though: Never, ever open the camera's lid or take out any photo paper unless you're in a darkroom or in complete darkness, otherwise you'll expose the paper and ruin it.

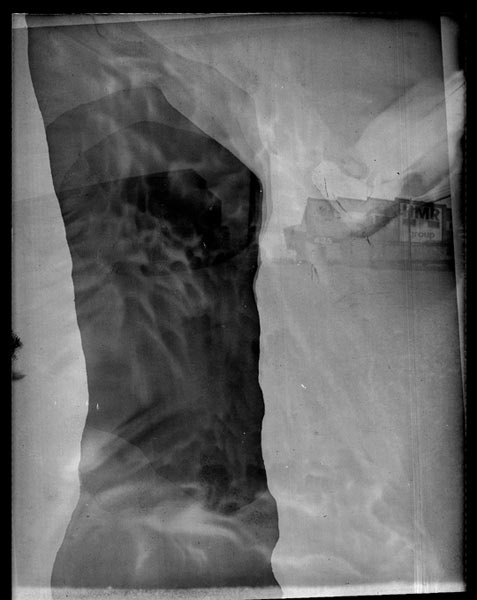
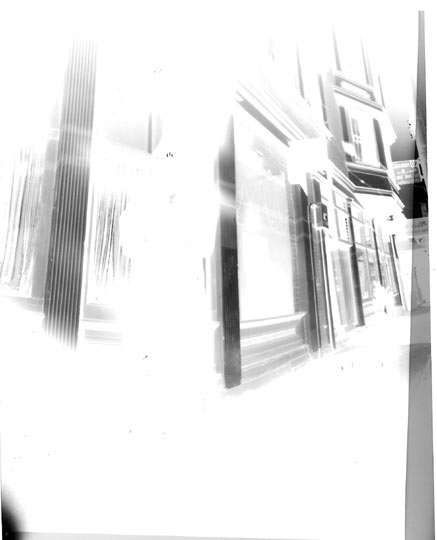
My first couple of attempts turned out pretty over-exposed. This is because I thought I could overcompensate for a less-sunny day via a longer exposure time. See? No one's above the rules. This is an attempt at a self-portrait. See how it wasn't sunny in my backyard? That's where I went wrong.

I ruined damn near half the pack of photo paper before I got it right. So if, like me, you're an inept amateur, just be prepared for some failures before you succeed.

Here are some examples of me fucking up:

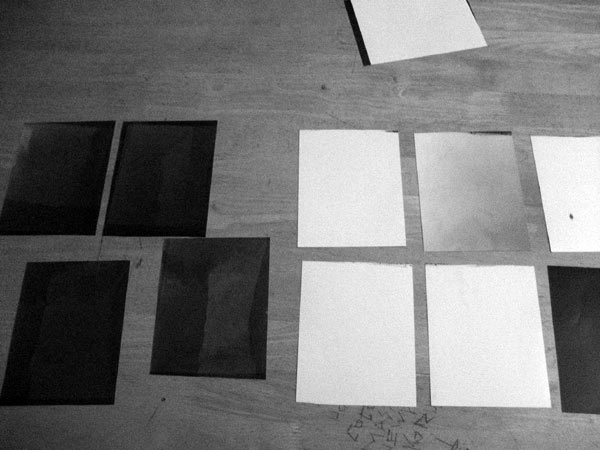
When photographic paper is exposed to light and then developed, the parts that turn black are the exposed parts. White means that it was under-exposed. You'll only find out after you develop the paper negative, though. No instant gratification here. Sorry, but it's a valuable life lesson. You're so impatient, it's really high time you learned a bit of self control. The first photo I took that even kind of halfway turned out was of this giant chimney:

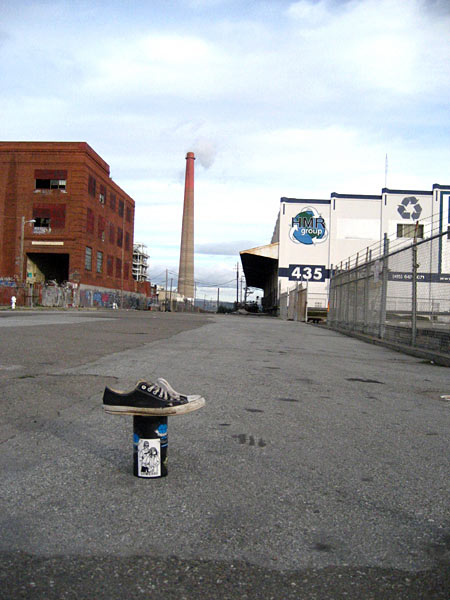
See how I put my shoe on the camera to keep it steady? If nothing else, this project will teach you improvisation and spontaneity. Here's what the negative looked like when I printed it up:

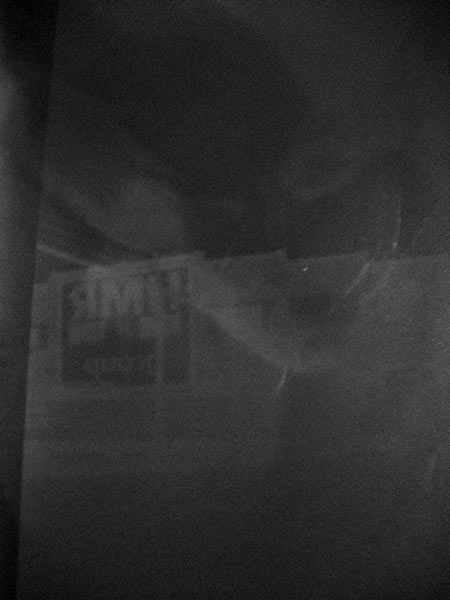
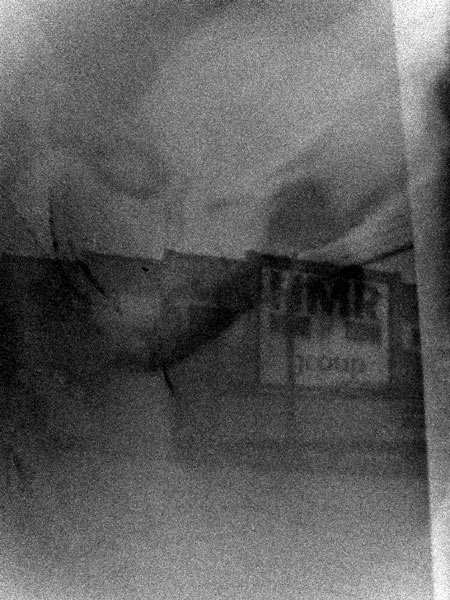
It turned out a bit over-exposed, but look! There's an image. We're making progress. Don't abandon this project now when we've come so far. See it through to the end! We're so close. Here's a print from this negative:

Not great, but, again, it's a start. See, look at the right side! A discernable image!

I'm not quitting here and neither should you.

Developing and Printing

As you may have noticed, there isn't any film in the traditional sense. The photo paper is the film, and when you develop it you get a backwards image with the values inverted. Just like a negative, only not on clear plastic. It's pretty simple actually, and the developing and printing is way easier.

Anyhow, I'm hoping that you're at least a bit familiar with the printing of photos, or have a friend who is. But even if not, I won't abandon you now. We're gonna get through this thing together, okay?

When you're still experimenting with exposure times and the like, it's helpful to have a darkroom at the ready. If you do, cool. If not, find one. You'll need the standard set up, pretty much: Developer, stop, fixer, clean water, tongs, trays, a red light, a plate of glass (for making a contact print), and an enlarger. A watch helps too.

When you're in the darkroom with the safe light on, open up your camera and remove the film. Place it in the tray of developer and agitate it for about a minute or 90 seconds, until the image appears. Real photographers will tell you that you have to time this down to the millisecond, but we're not real photographers, are we? We're dilettantes and dabblers, so follow your gut. After all, if the president follows his gut-regardless of what the facts are-so can you!

After the developer, use the tongs to take out the negative, making sure to let it drip sort of dry, and then plop it gingerly down into the stop bath. Leave it in there and agitate for about 10 seconds. Then take it out and let it drip before putting it into the fixer for about two minutes. Then into some room-temperature water for about 4 minutes. Then guess what? You have a negative! Turn on the lights and take a look at what you've created.

Is it a gross blob of crap? A black, blurred mess? A timeless masterpiece that expresses all the agony of the human condition? If it's too black, that means you over-exposed. Shoot some more, but try shooting only for 8 seconds. If your negative is white, go with 12 seconds. Go ahead, give it a try. I'll wait here.

Once you obtain a decent negative, one with a fair amount of contrast between the lights and the darks, it's time to shut off all your lights again and make a regular print. This is basically repeating the above steps of developing, only you need to make a contact print from your negative first. Here's how you do that:

Do you have an enlarger? Good. Hopefully it has a 15 watt bulb. Set the aperture at about 5.6 or whatever, then place your negative face down onto a piece of unexposed photo paper (face up: emulsion sides touching), and place the two pieces of paper underneath a plate of glass to hold them together. Then turn the light on for about 15 seconds (although you may have to experiment with the time here as well). If you're not lucky enough to have an enlarger, don't despair. Simply hold a light bulb a few feet from the pieces of photo paper and turn it on for a few seconds. I'm sorry that I can't be more exact than that. Figure it out, okay?

Then repeat the developing steps, let your print dry, and pat yourself on the back for a job well done! Congratulations, I knew you could do it.

Examples

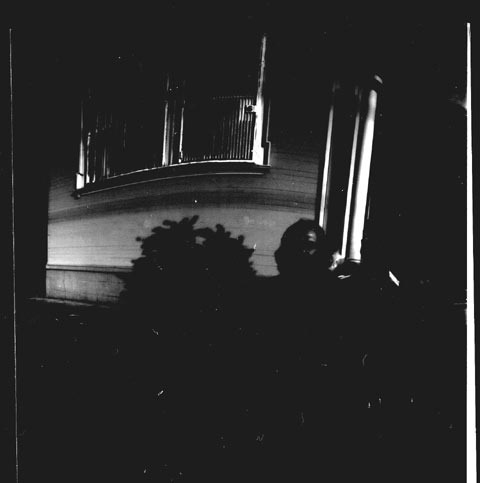
Some photos I took with Mr. Mike Short:

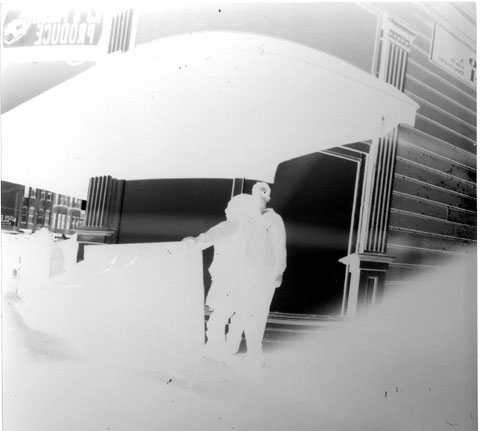
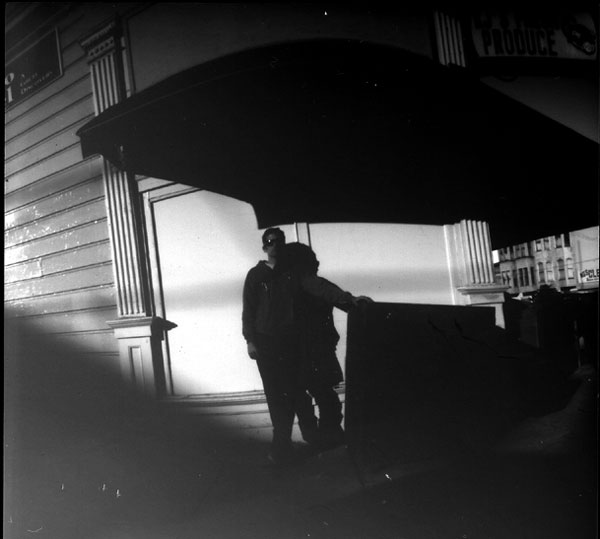
See? I'm getting better at this already.

Stick with it. One day we'll look back on this achievement with great fondness. We'll be old and withered, sitting on a porch, a tumbler of whiskey and water in hand, looking out over the land-once ripe with promise, but now weathered and bare-and I'll say to you, "Remember when we were young and dumb? How everything was big, wonderful. Weren't we so full of promise then? When the world was vast and unexplored. Wasn't that great?"

And you'll say, "I remember that dumb camera you made. What a waste of time."

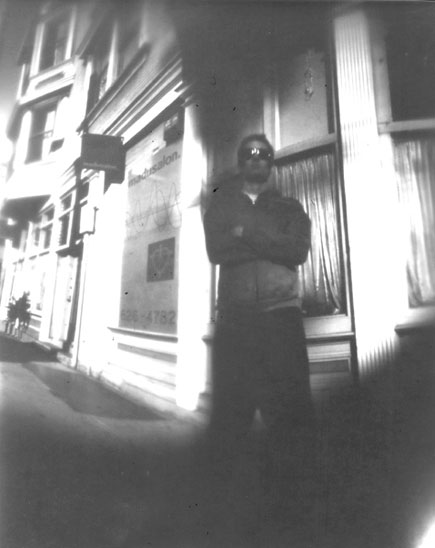
Then we'll both be silent, looking off into the distance at the fast approaching night. Only I'll secretly hate you from then on. Here's a crappy portrait of me:

Oh yeah, over the next couple of weeks we'll be lending this camera, loaded with film, to some of our favorite photographers. Check back to see what they come up with. Also, submit your own photos and become an instant internet celebrity (not really, that takes years of hard work). {moscomment}

Alison Blickle @NYC's Kravets Wehby Gallery

Los Angeles based Alison Blickle who showed here in San Francisco at Eleanor Harwood last year (PHOTOS) recently showed new paintings in New York at Kravets Wehby Gallery. Lovely works.


Interview w/ Kevin Earl Taylor

We haven't been featuring many interviews as of late. Let's change that up as we check in with a few local San Francisco artists like Kevin Earl Taylor here whom we studio visited back in 2009 (PHOTOS & VIDEO). It's been awhile, Kevin...


Peter Gronquist @The Shooting Gallery

If you like guns and boobs, head on over to the Shooting Gallery; just don't expect the work to be all cheap ploys and hot chicks. With Make Stuff by Peter Gronquist (Portland) in the main space and Morgan Slade's Snake in the Eagle's Shadow in the project space, there is plenty spectacle to be had, but if you look just beyond it, you might actually get something out of the shows.


Jay Bo at Hamburg's Circle Culture

Berlin based Jay Bo recently held a solo show at Hamburg's Circle Culture featuring some of his most recent paintings. We lvoe his work.


NYCHOS @Fifty24SF

Fifty24SF opened Street Anatomy, a new solo show by Austrian artist Nychos a week ago last Friday night. He's been steadily filling our city with murals over the last year, with one downtown on Geary St. last summer, and new ones both in the Haight and in Oakland within the last few weeks, but it was really great to see his work up close and in such detail.


Gator Skater +video

Nate Milton emailed over this great short Gator Skater which is a follow-up to his Dog Skateboard he emailed to us back in 2011... Any relation to this Gator Skater?


Ferris Plock Online Show Now Online as of April 25th

5 new wonderful large-scale paintings on wood panel are available. visit: www.ffdg.net


ClipODay II: Needles & Pens 11 Years!!

Congrats on our buddies at Needles and Pens on being open and rad for 11 years now. Mission Local did this little short video featuring Breezy giving a little heads up on what Needles and Pens is all about.


BANDES DE PUB / STRIP BOX

In a filmmaker's thinking, we wish more videos were done in this style. Too much editing and music with a lacking in actual content. Just because you can doesn't mean you should.


AJ Fosik in Tokyo at The Hellion Gallery

Matt Wagner recently emailed over some photos from The Hellion Gallery in Tokyo, who recently put together a show with AJ Fosik (Portland) called Beast From a Foreign Land. The gallery gave twelve of Fosik's sculptures to twelve Japanese artists (including Hiro Kurata who is currently showing in our group show Salt the Skies) to paint, burn, or build upon.


Ferris Plock - Online Show, April 25th

FFDG is pleased to announce an exclusive online show with San Francisco based Ferris Plock opening on Friday, April 25th (12pm Pacific Time) featuring 5 new medium sized acrylic paintings on wood.


GOLD BLOOD, MAGIC WEIRDOS

Backwoods Gallery in Melbourne played host to a huge group exhibition a couple of weeks back, with "Gold Blood, Magic Weirdos" Curated by Melbourne artist Sean Morris. Gold Blood brought together 25 talented painters, illustrators and comic artists from Australia, the US, Singapore, England, France and Spain - and marked the end of the Magic Weirdos trilogy, following shows in Perth in 2012 and London in 2013.


Jeremy Fish at LA's Mark Moore Gallery

San Francisco based Fecal Pal Jeremy Fish opened his latest solo show Hunting Trophies at LA's Mark Moore Gallery last week to massive crowds and cabin walls lined with imagery pertaining to modern conquest and obsession.


John Felix Arnold III on the Road to NYC

Well, John Felix Arnold III is at it again. This time, he and Carolyn LeBourgios packed an entire show into the back of a Prius and drove across the country to install it at Superchief Gallery in NYC. I met with him last week as he told me about the trip over delicious burritos at Taqueria Cancun (which is right across the street from FFDG and serves what I think is the best burrito in the city) as the self proclaimed "Only overweight artist in the game" spilled all the details.


FRENCH in Melbourne

London based illustrator FRENCH recently held a show of new works at the Melbourne based Mild Manners


Henry Gunderson at Ever Gold, SF

Ever Gold opened a new solo show by NYC based Henry Gunderson a couple Saturday nights ago and it was literally packed. So packed I couldn't actually see most of the art - but a big crowd doesn't seem like a problem. I got a good laugh at what I would call the 'cock climbing wall' as it was one of the few pieces I could see over the crowd. I haven't gotten a chance to go back and check it all out again, but I'm definitely going to as the paintings that I could get a peek at were really high quality and intruiguing. You should do the same.


Mario Wagner @Hashimoto

Mario Wagner (Berkeley) opened his new solo show A Glow that Transfers Creativity last Saturday night at Hashimoto Contemporary in San Francisco.


Serge Gay Jr. @Spoke Art

The paintings in the show are each influenced by a musician, ranging from Freddy Mercury, to Madonna, to A Tribe Called Quest and they are so stylistically consistent with each musician's persona that they read as a cohesive body of work with incredible variation. If you told me they were each painted by a different person, I would not hesitate to believe you and it's really great to see a solo show with so much variety. The show is fun, poppy, very well done, and absolutely worth a look and maybe even a listen.


NYCHOS Mural on Ashbury and Haight

NYCHOS completed this great new mural on the corner of Haight and Ashbury in San Francisco on Tuesday. Looks Amazing.


Sun Milk in Vienna

With rising rent in SF and knowing mostly other young artists without capitol, I desired a way to live rent free, have a space to do my craft, and get to see more of the world. Inspired by the many historical artists who have longed similar longings I discovered the beauty of artist residencies. Lilo runs Adhoc Collective in Vienna which not only has a fully equipped artists creative studio, but an indoor halfpipe, and private artist quarters. It was like a modern day castle or skate cathedral. It exists in almost a utopic state, totally free to those that apply and come with a real passion for both art and skateboarding


"How To Lose Yourself Completely" by Bryan Schnelle

I just wanted to share with you a piece I recently finished which took me 4 years to complete. Titled "How To Lose Yourself Completely (The September Issue)", it consists of a copy of the September 2007 issue of Vogue magazine (the issue they made the documentary about) with all faces masked with a sharpie, and everything else entirely whited out. 840 pages of fun. -Bryan Schnelle


Tyler Bewley ~ Recent Works

Some great work from San Francisco based Tyler Bewley.


Kirk Maxson and Alexis Mackenzie at Eleanor Harwood Gallery

While walking our way across San Francisco on Saturday we swung through the opening receptions for Kirk Maxson and Alexis Mackenzie at Eleanor Harwood Gallery in the Mission.


Jeremy Fish Solo Show in Los Angeles

Jeremy Fish opens Hunting Trophies tonight, Saturday April 5th, at the Los Angeles based Mark Moore Gallery. The show features new work from Fish inside the "hunting lodge" where viewers climb inside the head of the hunter and explore the history of all the animals he's killed.


The Albatross and the Shipping Container

Beautiful piece entitled "The Albatross and the Shipping Container", Ink on Paper, Mounted to Panel, 47" Diameter, by San Francisco based Martin Machado now on display at FFDG. Stop in Saturday (1-6pm) to view the group show "Salt the Skies" now running through April 19th. 2277 Mission St. at 19th.


The Marsh Barge - Traveling the Mississippi River from Minnesota to the Gulf of Mexico

For some reason I thought it would be a good idea to quit my job, move out of my house, leave everything and travel again. So on August 21, 2013 I pushed a canoe packed full of gear into the headwaters of the Mississippi River in Lake Itasca, Minnesota, along with four of my best friends. Exactly 100 days later, I arrived at a marina near the Gulf of Mexico in a sailboat.


contact FF

Gone Fishin'
Tuesday, 13 October 2015 11:39

I don't think at this point it needs to be written since the last update to Fecal Face was a long time ago, but...

I, John Trippe, have put this baby Fecal Face to bed. I'm now focusing my efforts on running ECommerce at DLX which I'm very excited about... I guess you can't take skateboarding out of a skateboarder.

It was a great 15 years, and most of that effort can still be found within the site. Click around. There's a lot of content to explore.

Hit me up if you have any ECommerce related questions. - trippe.io


SF Giants' World Series Trophy & DLX
Wednesday, 04 March 2015 17:21

I'm not sure how many people are lucky enough to have The San Francisco Giants 3 World Series trophies put on display at their work for the company's employees to enjoy during their lunch break, but that's what happened the other day at Deluxe. So great.

IMG_9585_sm

SF skateboarding icons Jake Phelps, Mickey Reyes, and Tommy Guerrero with the 3 SF Giants World Series Trophies


Alexis Anne Mackenzie - 2/28
Wednesday, 25 February 2015 10:21

SAN FRANCISCO --- Alexis Anne Mackenzie opens Multiverse at Eleanor Harwood in the Mission on Saturday, Feb 28th. -details

a_m


The Death of the Artist—and the Birth of the Creative Entrepreneur
Wednesday, 21 January 2015 10:34

When works of art become commodities and nothing else, when every endeavor becomes “creative” and everybody “a creative,” then art sinks back to craft and artists back to artisans—a word that, in its adjectival form, at least, is newly popular again. Artisanal pickles, artisanal poems: what’s the difference, after all? So “art” itself may disappear: art as Art, that old high thing. Which—unless, like me, you think we need a vessel for our inner life—is nothing much to mourn.

lead

Hard-working artisan, solitary genius, credentialed professional—the image of the artist has changed radically over the centuries. What if the latest model to emerge means the end of art as we have known it? --continue reading


"Six Degrees" @FFDG
Friday, 16 January 2015 09:30

"Six Degrees" opens tonight, Friday Jan 16th (7-10pm) at FFDG in San Francisco. ~Group show featuring: Brett Amory, John Felix Arnold III, Mario Ayala, Mariel Bayona, Ryan Beavers, Jud Bergeron, Chris Burch, Ryan De La Hoz, Martin Machado, Jess Mudgett, Meryl Pataky, Lucien Shapiro, Mike Shine, Minka Sicklinger, Nicomi Nix Turner, and Alex Ziv.

17_ms

Work by Meryl Pataky


In Wake of Attack, Comix Legend Says Satire Must Stay Offensive
Friday, 09 January 2015 09:59

Ron-Turner

Ron Turner of Last Gasp

"[Satire] is important because it brings out the flaws we all have and throws them up on the screen of another person," said Turner. “How they react sort of shows how important that really is.” Later, he added, "Charlie took a hit for everybody." -read on


Solidarity
Thursday, 08 January 2015 09:36

charlie


SF Bay Area: What Might Have Been
Tuesday, 06 January 2015 09:36

tiburonbridge

The San Francisco Bay Area is renowned for its tens of thousands of acres of beautiful parks and public open spaces.

What many people don't know is that these lands were almost lost to large-scale development. link


1/5/14 - Going Back
Monday, 05 January 2015 10:49

As we work on our changes, we're leaving Squarespace and coming back to the old server. Updates are en route.

The content that was on the site between May '14 and today is history... Whatever, wasn't interesting anyway. All the good stuff from the last 10 years is here anyway.

###########
 

Jacob Mcgraw-Mikelson & Rachell Sumpter @Park Life (5/23)
Friday, 23 May 2014 09:22

Opening tonight, Friday May 23rd (7-10pm) at Park Life in the Inner Richmond (220 Clement St) is Again Home Again featuring works from the duo Jacob Mcgraw-Mikelson & Rachell Sumpter who split time living in Sacramento and a tiny island at the top of Pudget Sound with their children.

Jacob Magraw will be showing embroidery pieces on cloth along with painted, gouache works on paper --- Rachell Sumpter paints scenes of colored splendor dropped into scenes of desolate wilderness. ~show details

park_life


NYPD told to carry spray paint to cover graffiti
Wednesday, 21 May 2014 10:37

nyc_graffitiNYC --- A new graffiti abatement program put forth by the police commissioner has beat cops carrying cans of spray paint to fill in and cover graffiti artists work in an effort to clean up the city --> Many cops are thinking it's a waste of resources, but we're waiting to see someone make a project of it. Maybe instructions for the cops on where to fill-in?

The NYPD is arming its cops with cans of spray paint and giving them art-class-style lessons to tackle the scourge of urban graffiti, The Post has learned.

Shootings are on the rise across the city, but the directive from Police Headquarters is to hunt down street art and cover it with black, red and white spray paint, sources said... READ ON


//////////
Wednesday, 16 June 2010 17:39


Alison Blickle @NYC's Kravets Wehby Gallery

Los Angeles based Alison Blickle who showed here in San Francisco at Eleanor Harwood last year (PHOTOS) recently showed new paintings in New York at Kravets Wehby Gallery. Lovely works.


Interview w/ Kevin Earl Taylor

We haven't been featuring many interviews as of late. Let's change that up as we check in with a few local San Francisco artists like Kevin Earl Taylor here whom we studio visited back in 2009 (PHOTOS & VIDEO). It's been awhile, Kevin...


Peter Gronquist @The Shooting Gallery

If you like guns and boobs, head on over to the Shooting Gallery; just don't expect the work to be all cheap ploys and hot chicks. With Make Stuff by Peter Gronquist (Portland) in the main space and Morgan Slade's Snake in the Eagle's Shadow in the project space, there is plenty spectacle to be had, but if you look just beyond it, you might actually get something out of the shows.


Jay Bo at Hamburg's Circle Culture

Berlin based Jay Bo recently held a solo show at Hamburg's Circle Culture featuring some of his most recent paintings. We lvoe his work.


NYCHOS @Fifty24SF

Fifty24SF opened Street Anatomy, a new solo show by Austrian artist Nychos a week ago last Friday night. He's been steadily filling our city with murals over the last year, with one downtown on Geary St. last summer, and new ones both in the Haight and in Oakland within the last few weeks, but it was really great to see his work up close and in such detail.


Gator Skater +video

Nate Milton emailed over this great short Gator Skater which is a follow-up to his Dog Skateboard he emailed to us back in 2011... Any relation to this Gator Skater?


Ferris Plock Online Show Now Online as of April 25th

5 new wonderful large-scale paintings on wood panel are available. visit: www.ffdg.net


ClipODay II: Needles & Pens 11 Years!!

Congrats on our buddies at Needles and Pens on being open and rad for 11 years now. Mission Local did this little short video featuring Breezy giving a little heads up on what Needles and Pens is all about.


BANDES DE PUB / STRIP BOX

In a filmmaker's thinking, we wish more videos were done in this style. Too much editing and music with a lacking in actual content. Just because you can doesn't mean you should.


AJ Fosik in Tokyo at The Hellion Gallery

Matt Wagner recently emailed over some photos from The Hellion Gallery in Tokyo, who recently put together a show with AJ Fosik (Portland) called Beast From a Foreign Land. The gallery gave twelve of Fosik's sculptures to twelve Japanese artists (including Hiro Kurata who is currently showing in our group show Salt the Skies) to paint, burn, or build upon.


Ferris Plock - Online Show, April 25th

FFDG is pleased to announce an exclusive online show with San Francisco based Ferris Plock opening on Friday, April 25th (12pm Pacific Time) featuring 5 new medium sized acrylic paintings on wood.


GOLD BLOOD, MAGIC WEIRDOS

Backwoods Gallery in Melbourne played host to a huge group exhibition a couple of weeks back, with "Gold Blood, Magic Weirdos" Curated by Melbourne artist Sean Morris. Gold Blood brought together 25 talented painters, illustrators and comic artists from Australia, the US, Singapore, England, France and Spain - and marked the end of the Magic Weirdos trilogy, following shows in Perth in 2012 and London in 2013.


Jeremy Fish at LA's Mark Moore Gallery

San Francisco based Fecal Pal Jeremy Fish opened his latest solo show Hunting Trophies at LA's Mark Moore Gallery last week to massive crowds and cabin walls lined with imagery pertaining to modern conquest and obsession.


John Felix Arnold III on the Road to NYC

Well, John Felix Arnold III is at it again. This time, he and Carolyn LeBourgios packed an entire show into the back of a Prius and drove across the country to install it at Superchief Gallery in NYC. I met with him last week as he told me about the trip over delicious burritos at Taqueria Cancun (which is right across the street from FFDG and serves what I think is the best burrito in the city) as the self proclaimed "Only overweight artist in the game" spilled all the details.


FRENCH in Melbourne

London based illustrator FRENCH recently held a show of new works at the Melbourne based Mild Manners


Henry Gunderson at Ever Gold, SF

Ever Gold opened a new solo show by NYC based Henry Gunderson a couple Saturday nights ago and it was literally packed. So packed I couldn't actually see most of the art - but a big crowd doesn't seem like a problem. I got a good laugh at what I would call the 'cock climbing wall' as it was one of the few pieces I could see over the crowd. I haven't gotten a chance to go back and check it all out again, but I'm definitely going to as the paintings that I could get a peek at were really high quality and intruiguing. You should do the same.


Mario Wagner @Hashimoto

Mario Wagner (Berkeley) opened his new solo show A Glow that Transfers Creativity last Saturday night at Hashimoto Contemporary in San Francisco.


Serge Gay Jr. @Spoke Art

The paintings in the show are each influenced by a musician, ranging from Freddy Mercury, to Madonna, to A Tribe Called Quest and they are so stylistically consistent with each musician's persona that they read as a cohesive body of work with incredible variation. If you told me they were each painted by a different person, I would not hesitate to believe you and it's really great to see a solo show with so much variety. The show is fun, poppy, very well done, and absolutely worth a look and maybe even a listen.


NYCHOS Mural on Ashbury and Haight

NYCHOS completed this great new mural on the corner of Haight and Ashbury in San Francisco on Tuesday. Looks Amazing.


Sun Milk in Vienna

With rising rent in SF and knowing mostly other young artists without capitol, I desired a way to live rent free, have a space to do my craft, and get to see more of the world. Inspired by the many historical artists who have longed similar longings I discovered the beauty of artist residencies. Lilo runs Adhoc Collective in Vienna which not only has a fully equipped artists creative studio, but an indoor halfpipe, and private artist quarters. It was like a modern day castle or skate cathedral. It exists in almost a utopic state, totally free to those that apply and come with a real passion for both art and skateboarding


"How To Lose Yourself Completely" by Bryan Schnelle

I just wanted to share with you a piece I recently finished which took me 4 years to complete. Titled "How To Lose Yourself Completely (The September Issue)", it consists of a copy of the September 2007 issue of Vogue magazine (the issue they made the documentary about) with all faces masked with a sharpie, and everything else entirely whited out. 840 pages of fun. -Bryan Schnelle


Tyler Bewley ~ Recent Works

Some great work from San Francisco based Tyler Bewley.


Kirk Maxson and Alexis Mackenzie at Eleanor Harwood Gallery

While walking our way across San Francisco on Saturday we swung through the opening receptions for Kirk Maxson and Alexis Mackenzie at Eleanor Harwood Gallery in the Mission.


Jeremy Fish Solo Show in Los Angeles

Jeremy Fish opens Hunting Trophies tonight, Saturday April 5th, at the Los Angeles based Mark Moore Gallery. The show features new work from Fish inside the "hunting lodge" where viewers climb inside the head of the hunter and explore the history of all the animals he's killed.


The Albatross and the Shipping Container

Beautiful piece entitled "The Albatross and the Shipping Container", Ink on Paper, Mounted to Panel, 47" Diameter, by San Francisco based Martin Machado now on display at FFDG. Stop in Saturday (1-6pm) to view the group show "Salt the Skies" now running through April 19th. 2277 Mission St. at 19th.


The Marsh Barge - Traveling the Mississippi River from Minnesota to the Gulf of Mexico

For some reason I thought it would be a good idea to quit my job, move out of my house, leave everything and travel again. So on August 21, 2013 I pushed a canoe packed full of gear into the headwaters of the Mississippi River in Lake Itasca, Minnesota, along with four of my best friends. Exactly 100 days later, I arrived at a marina near the Gulf of Mexico in a sailboat.


  HOME - NEWS - GOOD STUFF - INTERVIEWS - OPENINGS - VIDEO - MUSIC - CALENDAR -  FFDG  - ABOUT - RSS - SHOP
hosting provided by

© 2015 FECAL FACE DOT COM

Material published on FECAL FACE DOT COM online service is copyrighted by Fecal Face or its licensors, including the originating wire services. Such material is protected by U.S. and international copyright laws and treaties. All rights reserved.

Users of the Fecal Face online service may not reproduce, republish or redistribute material found on the web site in any form without the express written consent of the copyright holder.

Related Posts Plugin for WordPress, Blogger...